Spring MVC 동작 과정(WAS + DispatcherServlet)
was 실행 (서버 실행)
- Tomcat 같은 WAS가 실행되면서 웹 컨테이너의 ServletContext를 초기화
- web.xml 또는 Spring 설정 클래스를 읽어 DispatcherServlet 생성
Dispatcher 초기화
- DispatcherServlet이 ApplicationContext(IOC 컨테이너)를 생성
- @Component, @Service, @Repository, @Controller 같은 애노테이션이 붙은 클래스를 스캔해서 빈으로 등록
- HandlerMapping, ViewResolver 등의 설정도 함께 초기화
사용자의 요청 처리
- 사용자가 HTTP 요청을 보내면 WAS가 DispatcherServlet으로 전달
- DispatcherServlet이 HandlerMapping을 사용해 적절한 컨트롤러로 요청 전달
- 컨트롤러는 Service → Repository를 호출하여 비즈니스 로직 수행
응답 처리 및 반환
- 컨트롤러의 실행 결과를 반환
- 최종 응답을 WAS에 전달 → WAS가 클라이언트에게 응답 반환
아키텍처
1
2
3
4
5
6
7
8
9
10
11
12
13
14
15
16
17
18
19
20
21
22
23
24
25
26
27
28
29
30
31
32
| +--------------------------------------------------+
| Web Application Server (WAS) |
| (예: Tomcat, Jetty) |
| |
| +------------------------------------------+ |
| | ServletContext | | (WAS 환경 정보)
| | (웹 애플리케이션 정보 저장) | |
| +------------------------------------------+ |
| ⬇ (참조) |
| +------------------------------------------+ |
| | DispatcherServlet (Front Controller) | |
| | - HTTP 요청을 받아 Spring 처리 흐름 시작 | |
| | - WebApplicationContext 관리 | |
| +------------------------------------------+ |
| ⬇ (참조) |
| +------------------------------------------+ |
| | WebApplicationContext | | (Spring 컨테이너)
| | - Spring 빈(Bean) 저장소 | |
| | - HandlerMapping, ViewResolver 관리 | |
| +------------------------------------------+ |
| ⬇ (DI, 의존성 주입) |
| +------------------------------------------+ |
| | ontroller / Service / Repository | |
| | - 비즈니스 로직 수행 | |
| | - 데이터 조회 및 처리 | |
| +------------------------------------------+ |
| ⬇ (DB 접근) |
| +------------------------------------------+ |
| | Database (MySQL, PostgreSQL) | |
| +------------------------------------------+ |
+--------------------------------------------------+
|
궁금점🤔 스프링부트는 내장톰캣을 사용하는데, 아키텍처 상 WAS가 상위에 있는데, 어떻게 내장 톰캣을 사용하는 걸까?
전통적인 WAS 아키텍처
- WAS와 서블릿 컨테이너
- 전통적인 방식에는 WAS가 독립적으로 실행되며, 그 위에 서블릿 기반 애플리케이션을 배포하게 된다.
- 애플리케이션은 WAS에 배포되어 실행되며, WAS가 서블릿 요청을 처리한다.
- 구성
- 서블릿 컨테이너(톰캣 등) → 애플리케이션 배포 → 외부 WAS에서 관리하고 실행
스프링 부트의 내장 톰캣 아키텍처
스프링 부트 내장 톰켓을 사용하여, 애플리케이션이 독립적으로 실행될 수 있게 한다.
즉, 스프링 부트 애플리케이션이 실행될 때 톰캣 서버가 애플리케이션 내에 포함되어 별도의 WAS에 배포할 필요 없이, 애플리케이션 자체가 웹 서버 역할을 하게 된다. 스프링 부트의 내장 서버 사용은 아키텍처상 WAS를 애플리케이션 내장형으로 끌어들이는 방식이다. 이를 통해 개발자는 서버 환경을 설정하거나 별도의 서버를 설치하는 번거로움을 줄이고, 애플리케이션을 독립적으로 실행할 수 있다.
아키텍처
1
2
3
4
5
6
7
8
9
10
11
12
13
14
15
16
17
18
19
20
21
22
23
| +------------------+ +---------------------------+ +--------------------------+
| Application | -----> | Spring Boot Application | -----> | Tomcat Embedded Server |
| (SpringApplication.run()) | | Context | | (TomcatWebServer) |
+------------------+ +---------------------------+ +--------------------------+
| |
v v
+-------------------------------+
| DispatcherServlet |
| (HTTP Request Mapping) |
+-------------------------------+
|
v
+-----------------------------+
| Controller, Service, etc. |
| (Business Logic) |
+-----------------------------+
|
v
+-----------------------------+
| Response |
| (Return to User) |
+-----------------------------+
|
위의 아키텍처를 보면 이상한점이 눈에 띄인다.
원래 전통적인 WAS 방식에서는 WAS를 구동하면 서블릿 컨테이너가 생성되고 DispatcherServlet을 만든 후, DispatcherServlet이 웹어플리케이션 컨텍스트를 생성하게 된다. 하지만 위의 아키텍처에서는 스프링부트가 톰캣을 내장하고 있기 때문에, 애플리케이션을 실행하면 그 후 애플리케이션 컨텍스트가 먼저 만들어지고, 톰캣 인스턴스가 만들어지면서 그 때 서블릿 컨테이너를 만들게 된다.
코드로 확인하기
- 아래 코드는 스프링부트를 처음 실행할 때 사용하는 main 메서드이다.
- SpringApplication.run()의 코드를 확인해보자
1
2
3
4
5
6
7
8
9
10
11
12
13
14
| @SpringBootApplication
public class JpashopApplication {
public static void main(String[] args) {
ApplicationContext ctx = SpringApplication.run(JpashopApplication.class, args);
String[] beanNames = ctx.getBeanDefinitionNames();
Arrays.sort(beanNames);
Arrays.stream(beanNames).forEach(System.out::println);
}
}
|
- run() 메서드
- 1번 : SpringApplication.run() 메서드가 실행되면 IOC 컨테이너인 ApplicationContext를 생성하고 초기화하여 반환하게 된다.
- 2번 : ApplicationContext를 Refresh 하는 과정에서 WebServer가 생성되고 실행된다.
- WebSerever가 생성되고 실행되는 곳을 확인해보기 위해 해당 코드를 타고 들어가게 되면 추상화 되어있는 것을 확인할 수 있다.
1
2
3
4
5
6
7
8
9
10
11
12
13
14
15
16
17
18
| public ConfigurableApplicationContext run(String... args) {
// ...
try {
ApplicationArguments applicationArguments = new DefaultApplicationArguments(args);
ConfigurableEnvironment environment = this.prepareEnvironment(listeners, bootstrapContext, applicationArguments);
this.configureIgnoreBeanInfo(environment);
Banner printedBanner = this.printBanner(environment);
// 1. ApplicationContext 생성
context = this.createApplicationContext();
context.setApplicationStartup(this.applicationStartup);
this.prepareContext(bootstrapContext, context, environment, listeners, applicationArguments, printedBanner);
// 2. ApplicationContext Refresh 과정에서 WebServer 생성
this.refreshContext(context);
this.afterRefresh(context, applicationArguments);
// ...
}
|
1
2
3
4
5
6
7
| private void refreshContext(ConfigurableApplicationContext context) {
if (this.registerShutdownHook) {
shutdownHook.registerApplicationContext(context);
}
this.refresh(context); // 타고 들어가기
}
|
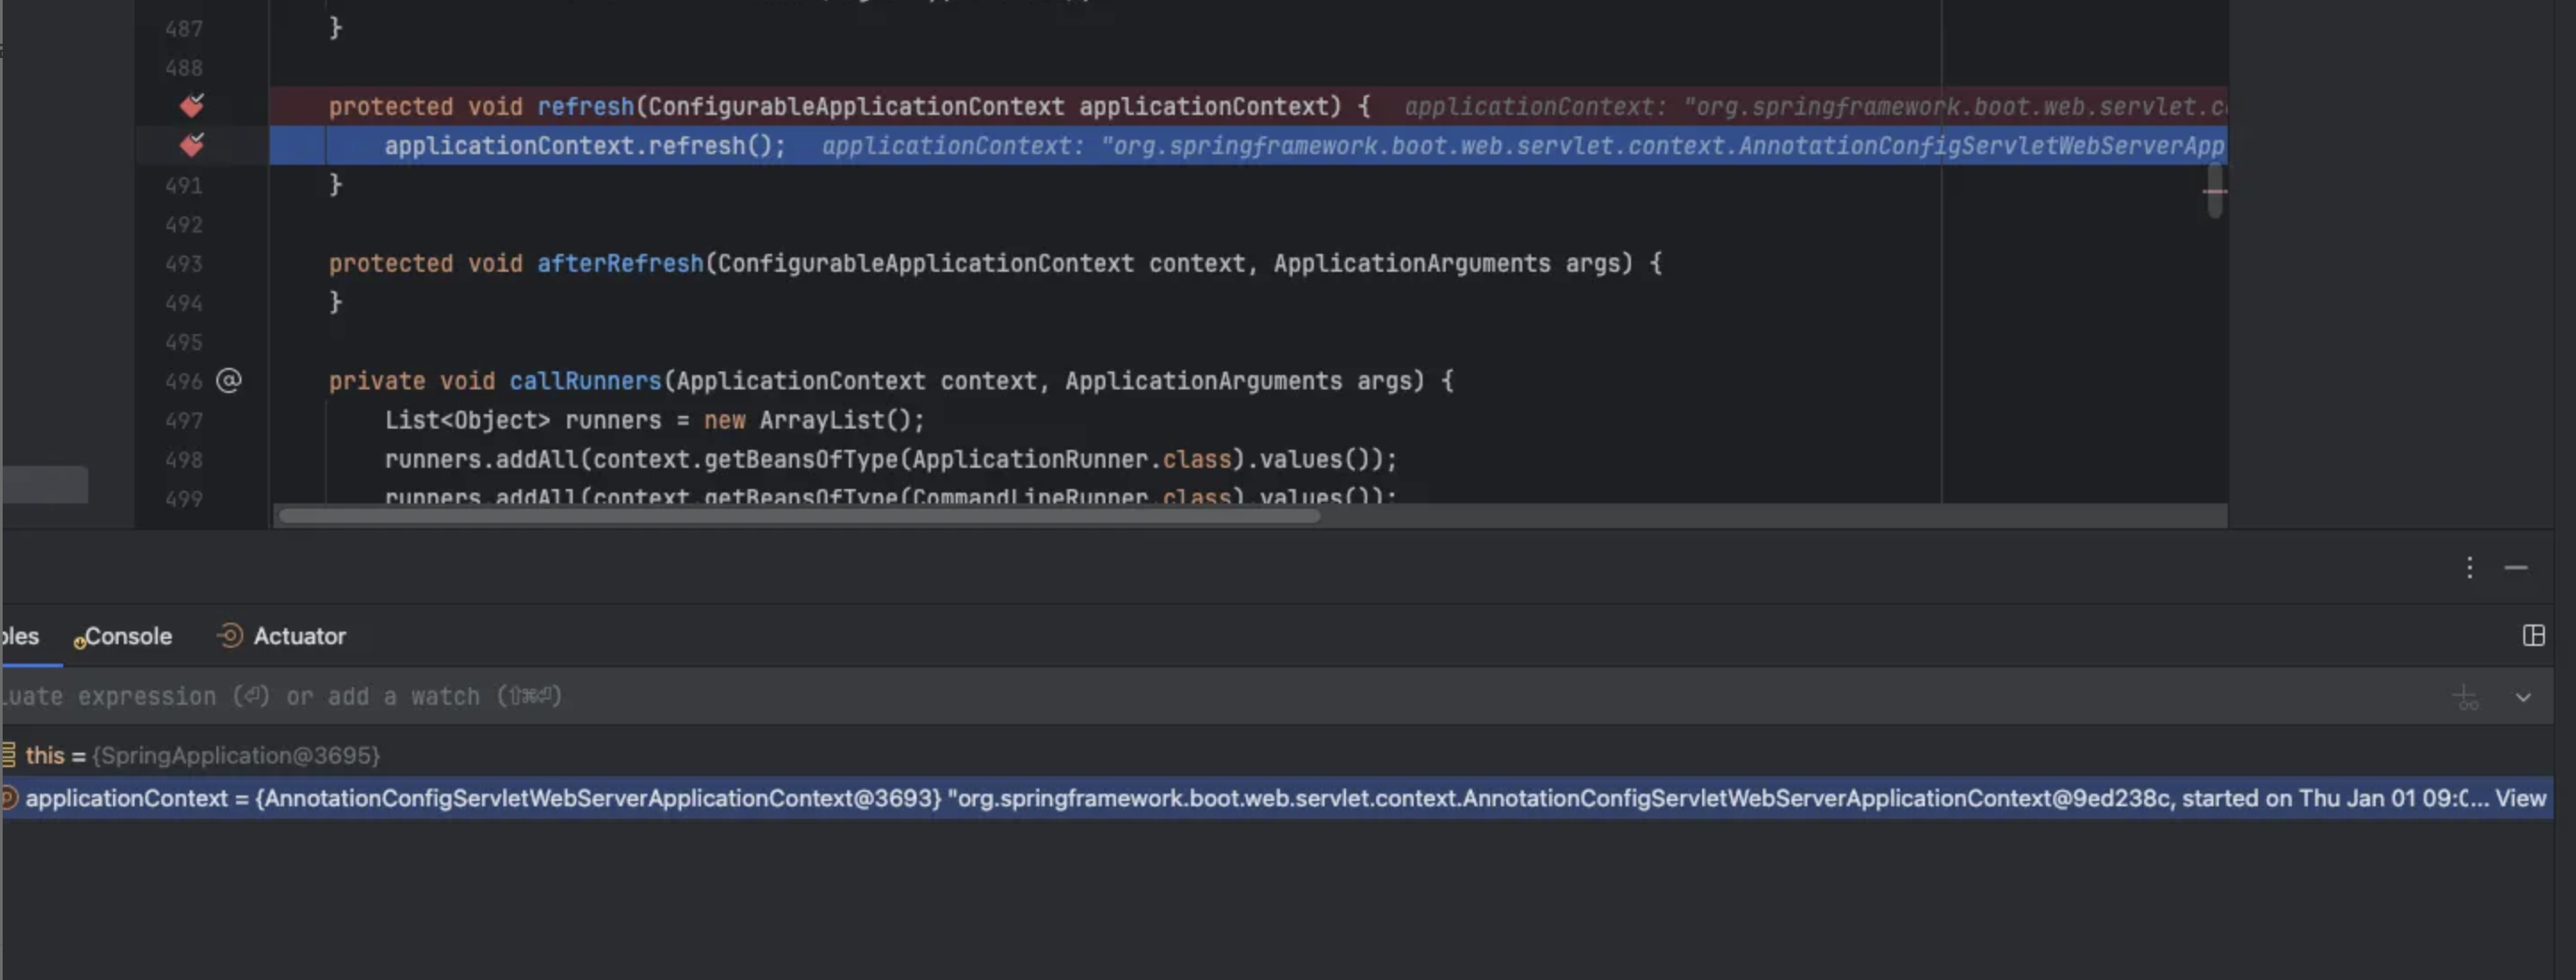
1
2
3
4
| // 타고 들어간 코드
protected void refresh(ConfigurableApplicationContext applicationContext) {
applicationContext.refresh(); // 다시 타고 들어가기
}
|
1
| void refresh() throws BeansException, IllegalStateException; // 추상화 되어있는 코드
|
1
2
3
4
5
6
7
8
9
10
11
12
13
14
15
16
17
18
19
20
21
22
23
24
25
26
27
28
29
30
31
32
33
34
35
36
37
38
39
| public void refresh() throws BeansException, IllegalStateException {
synchronized(this.startupShutdownMonitor) {
StartupStep contextRefresh = this.applicationStartup.start("spring.context.refresh");
this.prepareRefresh();
ConfigurableListableBeanFactory beanFactory = this.obtainFreshBeanFactory();
this.prepareBeanFactory(beanFactory);
try {
this.postProcessBeanFactory(beanFactory);
StartupStep beanPostProcess = this.applicationStartup.start("spring.context.beans.post-process");
this.invokeBeanFactoryPostProcessors(beanFactory);
this.registerBeanPostProcessors(beanFactory);
beanPostProcess.end();
this.initMessageSource();
this.initApplicationEventMulticaster();
// 1. 해당 코드에서 톰캣을 실행한다.
this.onRefresh();
this.registerListeners();
this.finishBeanFactoryInitialization(beanFactory);
this.finishRefresh();
} catch (BeansException var10) {
BeansException ex = var10;
if (this.logger.isWarnEnabled()) {
this.logger.warn("Exception encountered during context initialization - cancelling refresh attempt: " + ex);
}
this.destroyBeans();
this.cancelRefresh(ex);
throw ex;
} finally {
this.resetCommonCaches();
contextRefresh.end();
}
}
}
|
1
2
3
4
5
6
7
8
9
10
11
12
13
14
15
16
17
18
19
20
21
22
23
24
25
26
27
28
29
30
31
32
33
34
35
36
37
38
39
40
41
42
43
44
| public WebServer getWebServer(ServletContextInitializer... initializers) {
if (this.disableMBeanRegistry) {
Registry.disableRegistry();
}
// 톰캣 객체 생성
Tomcat tomcat = new Tomcat();
// 톰캣 기본 디렉토리 설정
// 애플리케이션 파일, 로그 파일 등 저장하는데 사용
File baseDir = this.baseDirectory != null ? this.baseDirectory : this.createTempDir("tomcat");
tomcat.setBaseDir(baseDir.getAbsolutePath());
Iterator var4 = this.serverLifecycleListeners.iterator();
while(var4.hasNext()) {
LifecycleListener listener = (LifecycleListener)var4.next();
tomcat.getServer().addLifecycleListener(listener);
}
// 커넥터 생성
// 커넥터는 클라이언트 요청을 수신하고 톰켓 엔진에 전달하는 역할
Connector connector = new Connector(this.protocol);
connector.setThrowOnFailure(true);
tomcat.getService().addConnector(connector);
// 포트번호 등등 정의
this.customizeConnector(connector);
tomcat.setConnector(connector);
tomcat.getHost().setAutoDeploy(false);
this.configureEngine(tomcat.getEngine());
Iterator var8 = this.additionalTomcatConnectors.iterator();
while(var8.hasNext()) {
Connector additionalConnector = (Connector)var8.next();
tomcat.getService().addConnector(additionalConnector);
}
// 서블릿 컨텍스트에 등록
// 주의할점으로 톰캣을 등록하는게 아니라, 톰캣은 이미 시작이 되어있고, 필터, 리스너 등등을 등록하는거임
this.prepareContext(tomcat.getHost(), initializers);
return this.getTomcatWebServer(tomcat);
}
|
정확한 동작 순서 [스프링] (매우 중요!!!)
- WAS 실행
- WAS가 실행되면, 웹 애플리케이션을 관리하고 실행하기 위한 웹 컨테이너를 생성
- 웹 컨테이너가 생성될 때 web.xml 파일을 읽고 필요한 컴포넌트 생성 및 서블릿 컨테이너 생성
- 웹 컨테이너는 web.xml 파일을 읽어서 웹 애플리케이션에 대한 설정 정보를 파싱
- 웹 컨테이너는 web.xml 파일에 정의된 필터, 리스너 등을 생성하고 초기화
- 웹 컨테이너는 서블릿 컨테이너를 생성
- 웹 컨테이너는 서블릿 컵테이너에게 web.xml 파일에 정의된 서블릿들을 생성하고 관리하도록 지시
- 생성된 서블릿 컨테이너는 웹 컨테이너에게 받은 지시에 따라 서블릿들을 생성하고 초기화
- ContextLoaderListener 생성 및 루트 웹 어플리케이션 컨텍스트 생성 (선택사항)
- 웹 컨테이너는 web.xml 파일에 ContextLoaderListener가 정의되어 있는지 확인
- 정의되어 있으면, ContextLoaderListner를 생성하고 초기화한다.
- 루트 웹 어플리케이션 컨텍스트는 애플리케이션 전체에서 공유되는 빈들을 관리한다. (데이터소스, 트랜잭션 매니저 등)
- DispatcherServlet 생성 및 초기화
- 서블릿 컨테이너는 web.xml 파일에 정의된 DispatcherServlet 을 생성한다.
- 서블릿 컨테이너는 DispatcherServlet의 init() 메서드를 호출하여 DispatcherServlet을 초기화한다.
- DispatcherServlet의 웹 어플리케이션 컨텍스트(스프링 컨테이너는 웹 어플리케이션 컨텍스트의 종류) 생성
- DispatcherServlet의 init() 메서드는 DispatcherServlet 자신만의 웹 애플리케이션 컨텍스트를 생성한다.
- DipatcherServlet 컨텍스트는 컨트롤러, 뷰 리졸버 등 해당 DispatcherServlet에서만 사용되는 빈들을 관리한다.
- 웹 어플리케이션 컨텍스트(스프링 컨테이너)는 스프링 설정 파일을 로딩 및 빈을 생성한다.
- 스프링 컨테이너(루트 웹 어플리케이션 또는 웹 어플리케이션 컨텍스트)는 스프링 설정 파일(applicationContext.xml, servlet-context.xml)을 로딩한다.
- 스프링 컨테이너는 스프링 설정 파일에 정의된 빈들을 생성하고 의존성 주입을 통해 빈들을 연결한다.